
What is this about?
With SCIM (System for Cross-domain Identity Management, version 2.0), Microsoft Entra ID transfers your users to unixpass automatically. New employees are available in unixpass as contacts without manual maintenance, changes in the directory (e. g. phone number or site) are applied, and anyone removed from the authorised group is deactivated in unixpass.
Provisioning runs via a dedicated enterprise application in Entra. It complements sign-in via single sign-on: SSO handles the login, SCIM the user data. Both can be used independently of each other.
Who configures what?
Own unixpass installation (OnPremise / Master)
You use the SCIM address of your system and the token stored there and set up part 1 yourself.
Tenant in the R3levance cloud
R3levance support provides the tenant URL and secret token of your tenant. You carry out the setup in Entra (part 1) yourself.
Prerequisites
- Access to the Microsoft Entra admin center with at least the Application Administrator role
- Anyone who is to edit the attribute mapping later needs administrator rights on exactly this enterprise application (Application Administrator role or registered as owner of the app)
- Tenant URL and secret token of your unixpass installation
- A security group containing all users who should arrive in unixpass (assigning groups to applications requires Microsoft Entra ID P1)
Part 1 — Microsoft Entra: set up SCIM provisioning
Create an enterprise application for SCIM
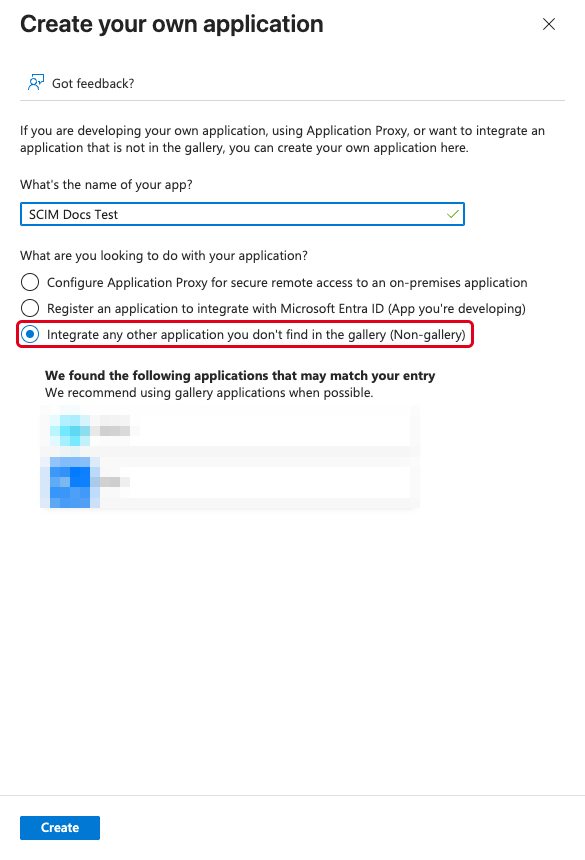
In the Entra admin center, open Entra ID → Enterprise apps and select + New application → + Create your own application. Enter a meaningful name, e. g. “unixpass SCIM”. Ignore the gallery apps suggested below the name. Make sure “Integrate any other application you don't find in the gallery” (non-gallery) is selected and click Create. Wait until the application overview opens — this can take a few seconds.
Configure the connection to unixpass
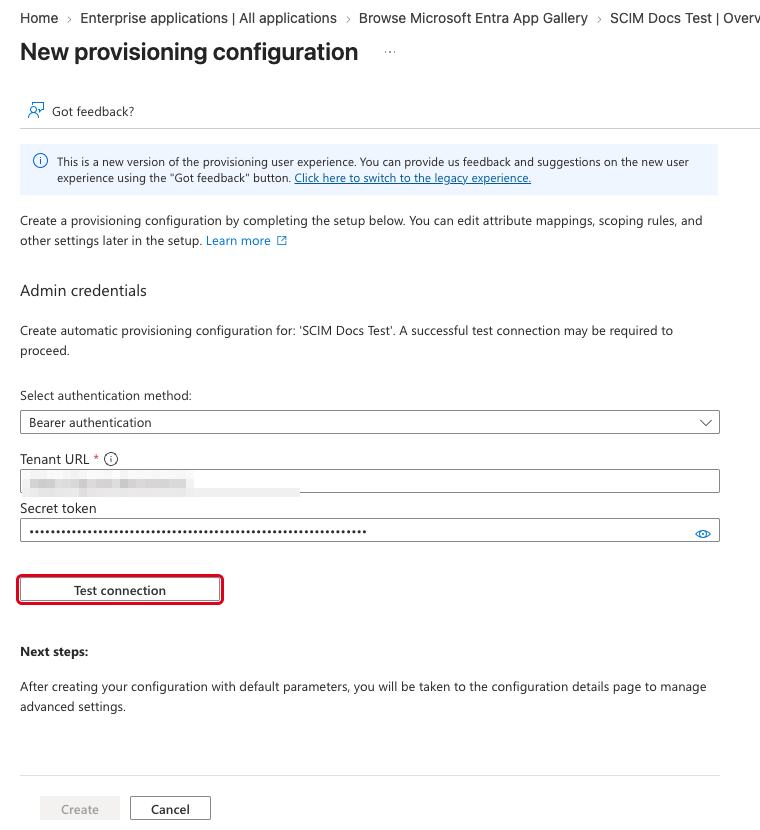
In the new app, select Provisioning on the left, then + New configuration. Leave the authentication method on Bearer authentication and enter:
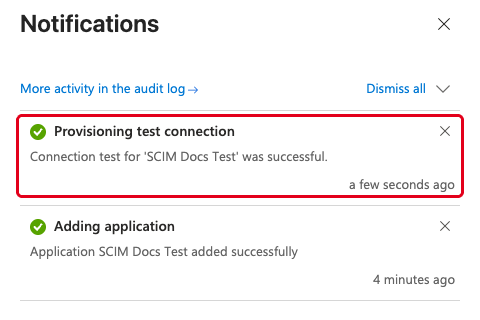
/v2 at the end of the tenant URL is mandatory. With …/scim alone the connection test fails. <UNIXPASS-URL> is a placeholder for the address of your system; for R3levance cloud tenants the full URL is part of the credentials from support.Click Test connection and wait for the notification that the provisioning test connection was successful (you can also open it with the bell icon at the top right). If the test fails, check the tenant URL and the secret token for missing characters or extra spaces. Create only becomes clickable after a successful test — it creates the provisioning job.
Turn off group provisioning
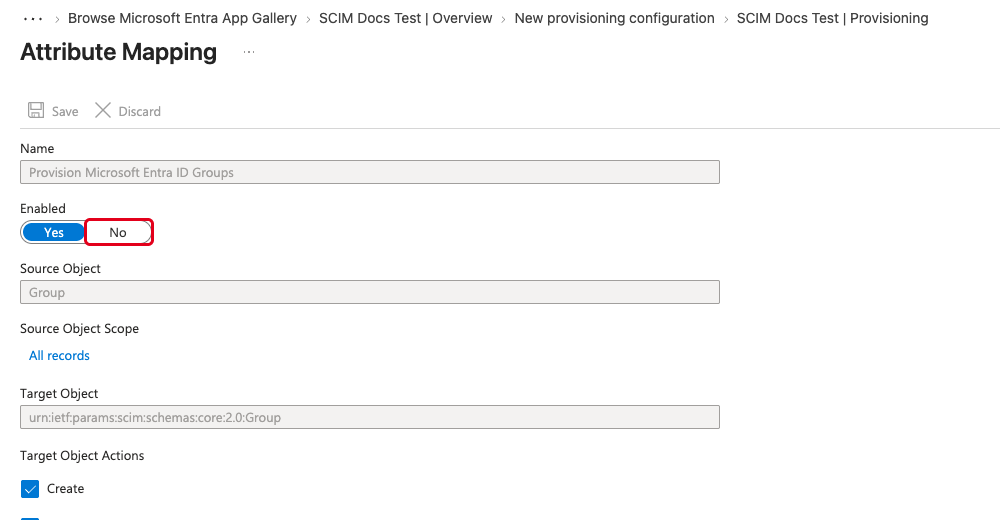
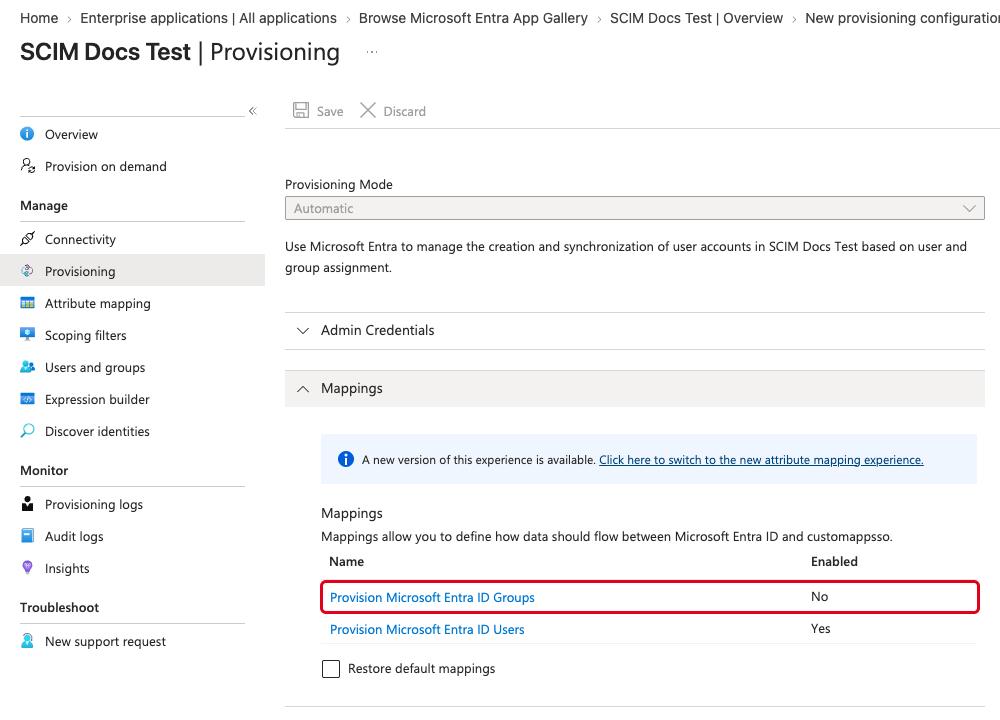
unixpass only receives users — groups must not be sent. In the provisioning menu, click Provisioning, expand Mappings and open Provision Microsoft Entra ID Groups. Set Enabled to No, click Save and confirm with Yes. Then close the page with the X at the top right.
Remove the default mappings
Entra adds many default mappings that unixpass does not use. Only four stay. Open Attribute mapping and keep only these rows on the Users tab:
| Source attribute (Microsoft Entra ID) | Target attribute (customappsso) |
|---|---|
userPrincipalName | userName |
givenName | name.givenName |
surname | name.familyName |
preferredLanguage | preferredLanguage |
Delete every other row with the trash icon at the end of the row and confirm each deletion with Yes — Microsoft shows the same warning text for every row; it is safe to confirm. When only the four rows are left, click Save and confirm with Yes.
userPrincipalName → userName row: unixpass uses it to identify the user.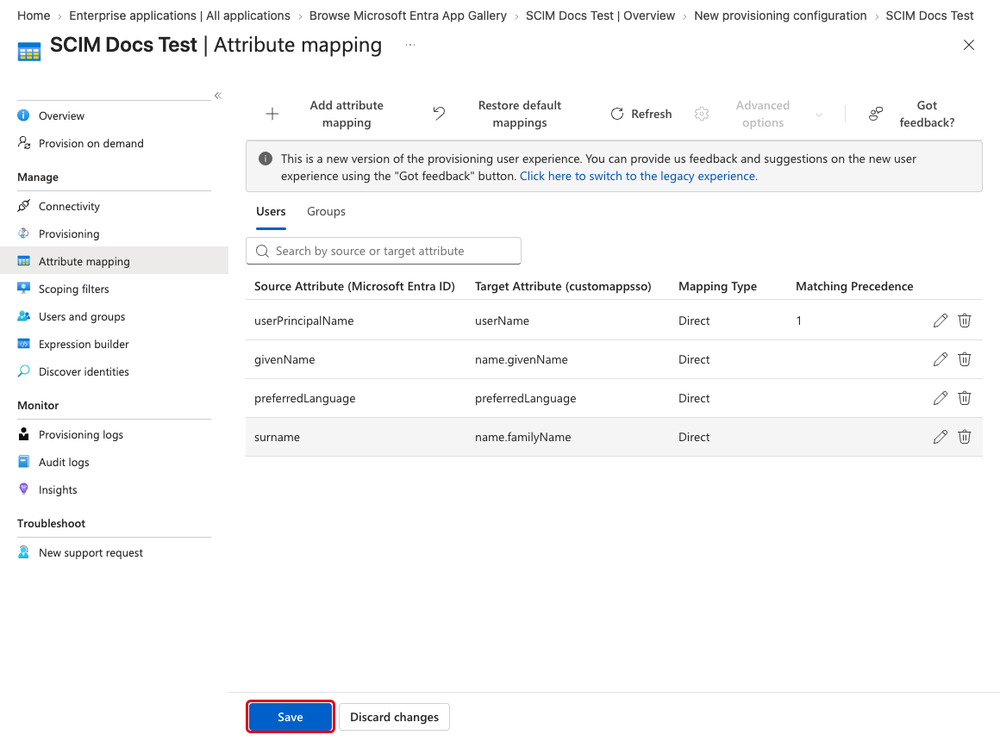
Add the unixpass attributes in Entra
Entra does not know the unixpass attributes yet. They must be added to the attribute list once:
- Click Advanced options — the button is only clickable when all changes are saved — and then Edit customappsso user attributes. If the option does not appear, open the app once via
https://portal.azure.com/?Microsoft_AAD_Connect_Provisioning_forceSchemaEditorEnabled=true. - Scroll to the end of the list and click + Add new attribute. Replace NewAttribute1 with the first name from the list below; leave the type on String and all other fields empty.
- Repeat this for every attribute in the list. Copy the names exactly, including upper and lower case.
- Click Save and confirm with Yes. You are taken back to the Attribute mapping page.
urn:ietf:params:scim:schemas:extension:i3g:2.0:User:email
urn:ietf:params:scim:schemas:extension:i3g:2.0:User:phoneNumber
urn:ietf:params:scim:schemas:extension:i3g:2.0:User:location
urn:ietf:params:scim:schemas:extension:i3g:2.0:User:organisation
urn:ietf:params:scim:schemas:extension:i3g:2.0:User:country
urn:ietf:params:scim:schemas:extension:i3g:2.0:User:city
urn:ietf:params:scim:schemas:extension:i3g:2.0:User:zip
urn:ietf:params:scim:schemas:extension:i3g:2.0:User:street
urn:ietf:params:scim:schemas:extension:i3g:2.0:User:streetNumber
urn:ietf:params:scim:schemas:extension:i3g:2.0:User:streetAddress
urn:ietf:params:scim:schemas:extension:i3g:2.0:User:birthday
urn:ietf:params:scim:schemas:extension:i3g:2.0:User:salutation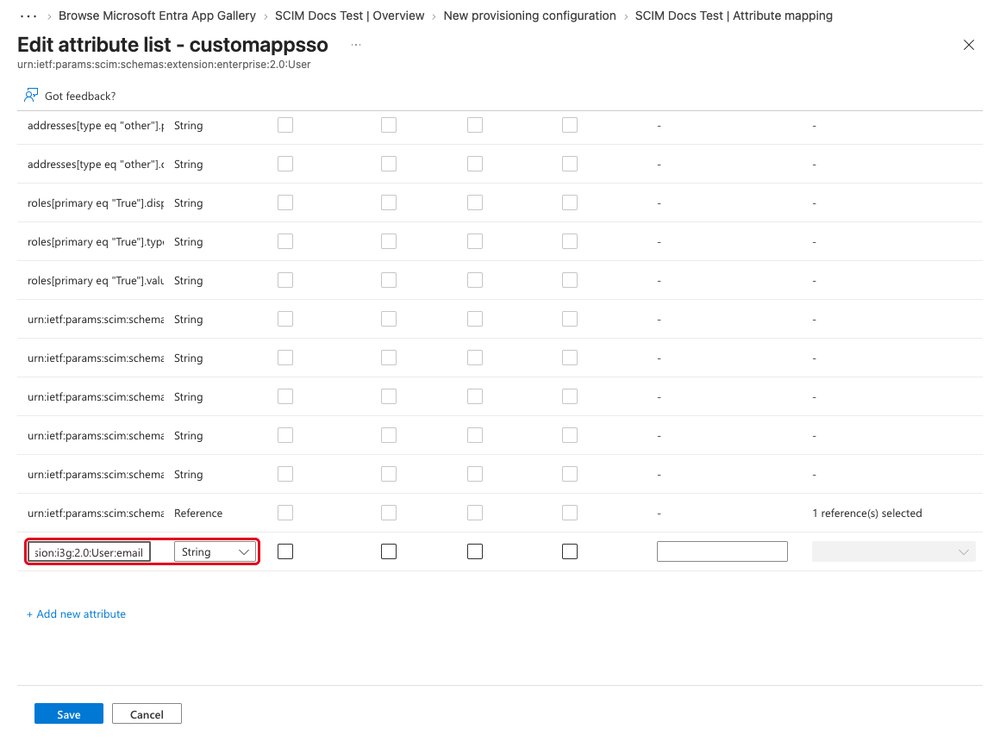
Map the attributes
Now tell Entra which user field goes into which unixpass attribute. Repeat the following steps for every row of the table:
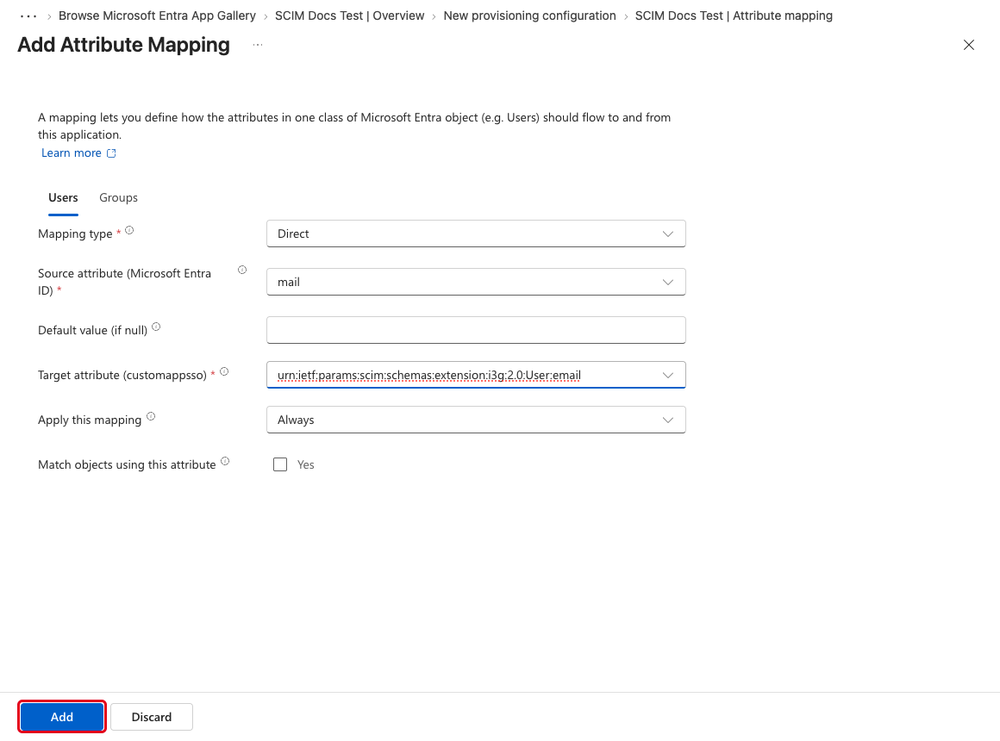
- Click Add new mapping (Add attribute mapping) and leave the mapping type on Direct.
- Under Source attribute, select the Entra attribute from the table, e. g.
mail. - Under Target attribute (customappsso), select the matching unixpass attribute, e. g.
urn:ietf:params:scim:schemas:extension:i3g:2.0:User:email. The unixpass attributes are near the end of the list; the names are cut off on the right — check the end of the name carefully. - Check both fields, leave Default value, Apply this mapping and Match objects using this attribute unchanged and click Add.
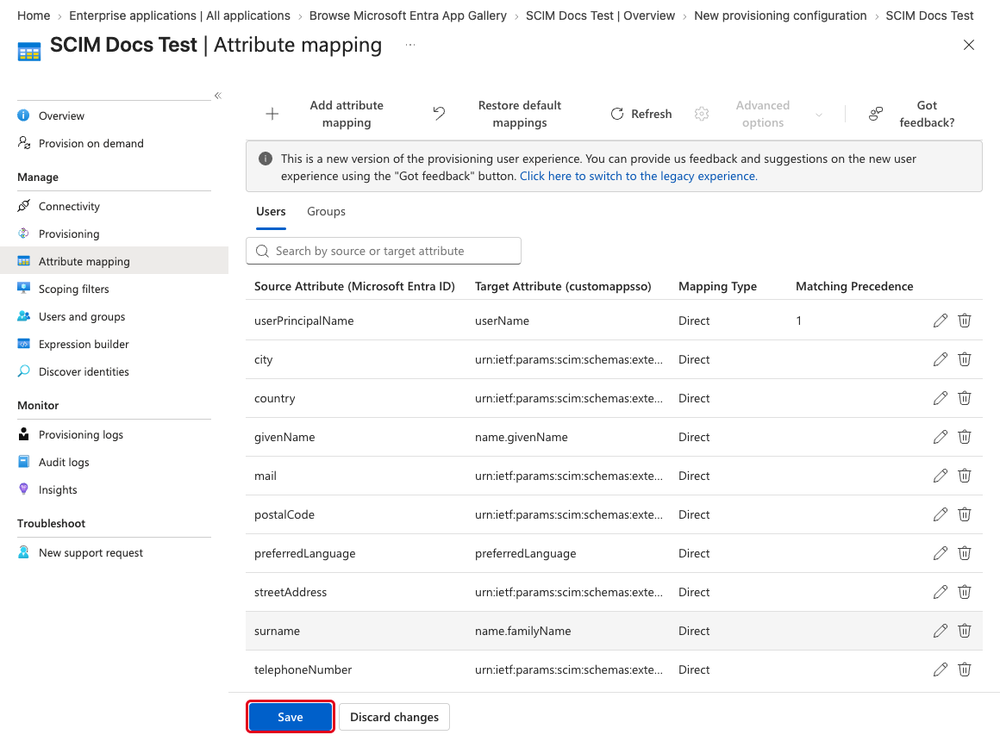
| Source attribute (Entra) | Target attribute (unixpass) |
|---|---|
mail | …:email |
telephoneNumber (or mobile) | …:phoneNumber |
city | …:city |
country | …:country |
postalCode | …:zip |
streetAddress | …:streetAddress |
The prefix … stands for urn:ietf:params:scim:schemas:extension:i3g:2.0:User.
Optional mappings — only if unixpass asked you to send these fields:
| Source attribute (Entra) | Target attribute (unixpass) |
|---|---|
physicalDeliveryOfficeName (or city) | …:location |
| Expression, see below | …:organisation |
| custom source attribute or expression | …:streetNumber |
| custom source attribute or expression | …:birthday |
| custom source attribute or expression | …:salutation |
Switch([city], "", "Sampletown", "Example Ltd", "Exampleville", "Sample Inc")[city] is the user attribute that is checked. The first value ("") is sent when no city matches — in that case no organisation is assigned. The remaining values are pairs: if the city is “Sampletown”, the organisation “Example Ltd” is sent, and so on. The organisation names must match the organisation names in unixpass exactly.When all mappings are added, click Save and confirm with Yes. Entra does not transfer empty values: if a source attribute is not maintained in the directory, the field stays empty or unchanged in unixpass. Every change to the mapping makes Entra re-evaluate all assigned users in the next cycle — so make changes in bundles where possible.
Choose which users are sent
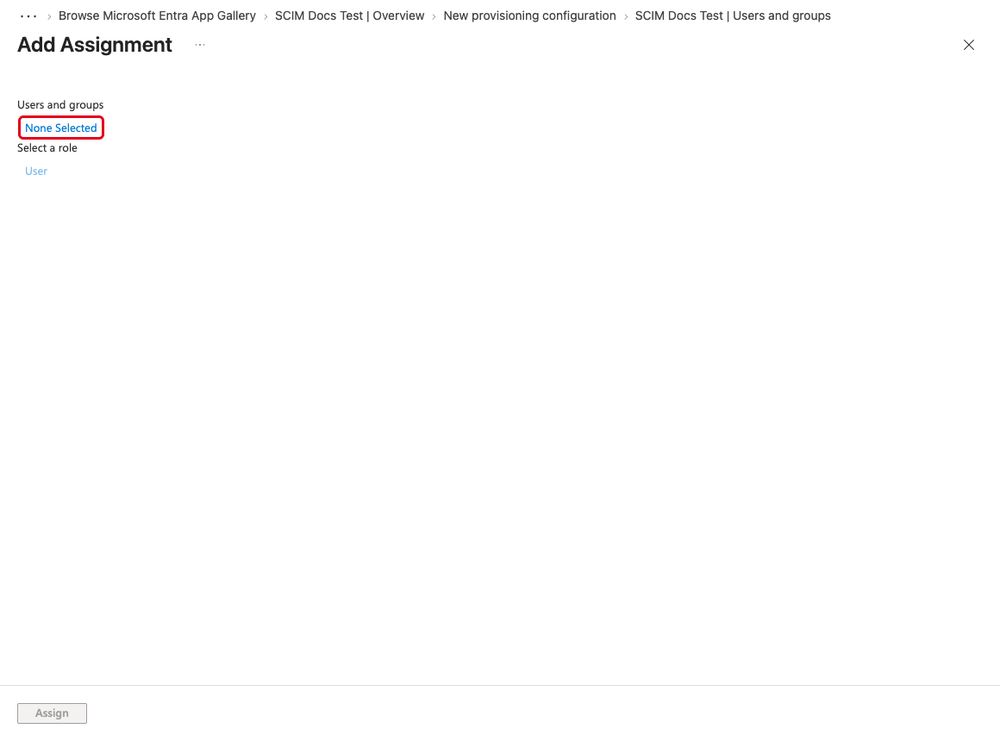
Only users assigned to the SCIM app arrive in unixpass. In the provisioning menu, open Users and groups, click Add user/group and then None selected. Search for the users or groups that should be sent to unixpass, select them, click Select and then Assign. The easiest way is a security group: new employees are then provisioned simply through group membership.
- Leave the scope in the provisioning settings on “Sync only assigned users and groups”. Without an assignment, nobody is transferred.
- Nested groups are not resolved — only direct members of the assigned group are provisioned.
- If a user is removed from the group or deactivated in Entra, Entra sets them to inactive in unixpass via SCIM (
active = false).
Test with one user
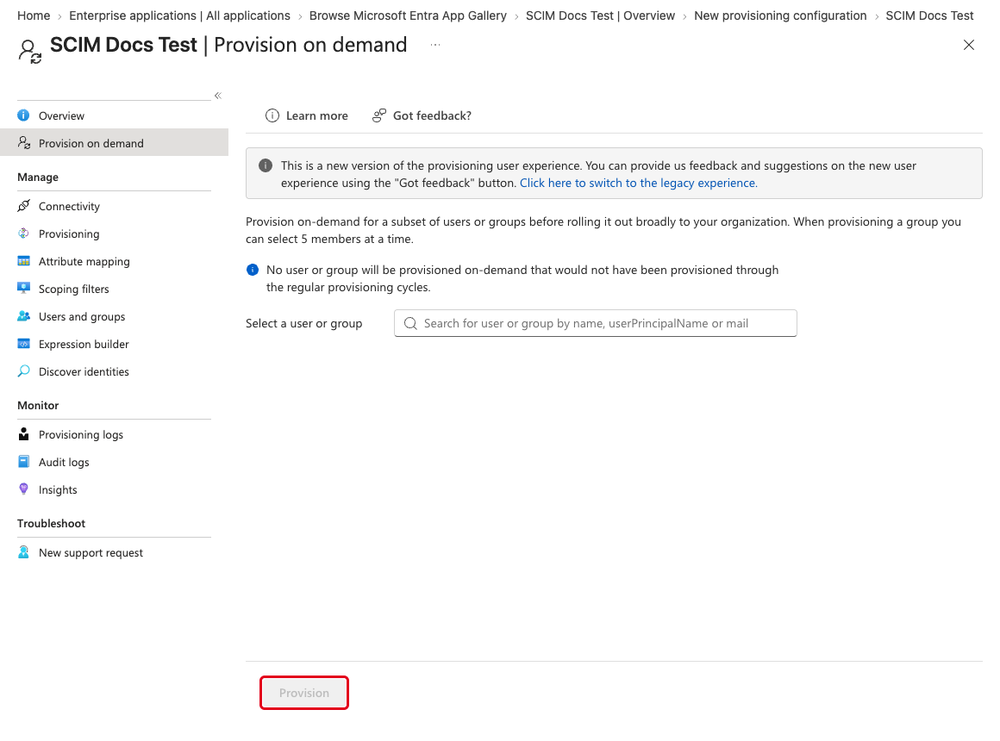
Test with a single user before you provision for everyone. In the provisioning menu, click Provision on demand, search for an assigned user and select them. Click Provision and wait until all steps show a green check mark. The user should now be visible in unixpass; if a step fails, the error details are shown right there. You also see the attribute values that were actually sent.
Start provisioning
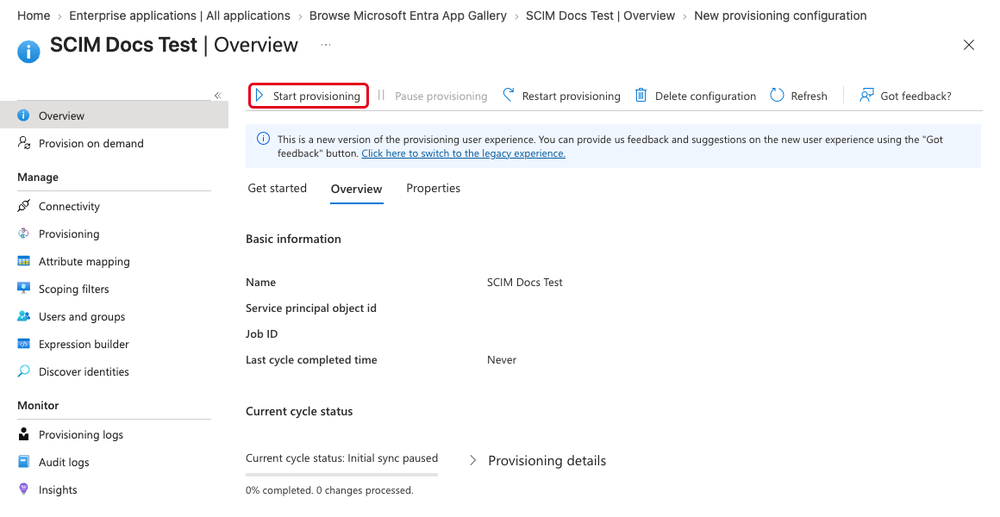
In the provisioning menu, click Overview, then Start provisioning. Optionally, Microsoft recommends enabling e-mail notifications for errors under Overview → Properties (recipient: your admin mailbox) and switching on prevent accidental deletion.
Entra now syncs all assigned users. The first run can take a while; after that, Entra syncs changes about every 40 minutes — so directory changes do not appear in unixpass immediately. You can follow the progress under Provisioning logs.
Final check
Open Provisioning in the provisioning menu and expand Mappings: Provision Microsoft Entra ID Groups must show No, Provision Microsoft Entra ID Users must show Yes. Opening the user mapping also shows the Target Object Actions — Create, Update and Delete must all be checked (default).
Values you need
| Tenant URL | https://<UNIXPASS-URL>/scim/v2 — with /v2 |
|---|---|
| Secret token | Bearer token of your unixpass installation (without the word “Bearer”) |
| Assigned users/group | Security group with all users who should arrive in unixpass |
| Schema extension | urn:ietf:params:scim:schemas:extension:i3g:2.0:User |
Part 2 — unixpass: check the result
After the first cycle, you will find the transferred users in the unixpass extranet under Contacts. Check a sample:
- Contact data: e-mail, phone number and address match the values from Entra.
- City: every user has a city. If the optional mappings were agreed, employees are additionally assigned to the matching site.
- Organisation: if the organisation mapping was agreed, the users are assigned to the correct organisation.
- Deactivation: a test user you remove from the group becomes inactive in unixpass after the next cycle.
Testing & troubleshooting
If something goes wrong: 1. check the Provisioning logs for the detailed SCIM requests and responses, 2. verify the Attribute mapping, 3. test with Provision on demand before starting provisioning, 4. verify that the contact data in the extranet matches expectations.
The first place to look is the Provisioning logs of the SCIM app: they show for each user which action Entra performed and with what result. If required, unixpass support can additionally check which requests from the SCIM app arrived on the unixpass side.
| Connection test fails (404 / Not Found) | Tenant URL incomplete — does it end with /scim/v2? |
| Connection test fails (401 / Unauthorized) | Secret token copied incorrectly (spaces? the word “Bearer” in front?) or no longer valid — enter the token only, again. |
| Users do not arrive | User or group not assigned to the SCIM app, user only an indirect (nested) member, scope not set to “assigned users” — or the next cycle (approx. 40 minutes) has not run yet. Use Provision on demand for testing. |
| Fields remain empty | Mapping missing in the attribute mapping, or the source attribute is not maintained in Entra (empty values are not transferred). Provision on demand shows the values sent. |
| User without site | Expected for plain contacts. For employees at your sites: check the optional location mapping and the value of city or physicalDeliveryOfficeName. |
| Option “Edit target User attributes” missing | Enable the schema editor via the link in step 5; administrator rights on the app are also required. |
| Provisioning is in “quarantine” | Entra received repeated errors and increased the intervals. Fix the cause in the logs (usually token or URL), then restart provisioning. |